Wednesday, 20 February 2013

Spicing it Up a Bit

When I was in college I spent a lot of time watching cooking shows, one of my favorites was Emeril Live.  He always seemed larger then life and just made watching fun.  I think it was because he didn't seem like your regular chef, tossing things in the pots, adding a "BAM" here and there and just really enjoying what he was doing.  I've always wanted to try something Emerilish and I can't think of anything better then something that's Cajun inspired with a little twist.


I have a Blackened Chicken with Creamy Angel Hair Pasta recipe that I found on The Kitchn that I've been meaning to try, but, Aaron can't take a lot of spice in his foods so I've been trying to come up with something similar but different to try.  I spent this morning doing just that.  The basics of the recipe are the same, but I've changed things up, including adding a marinade for the chicken, to make it my own so I'm hoping this works out tonight.

The marinade I'm adding I found on a blog called A Thrifty Mom and I wanted to change it up a bit to play with some spices I have in my cupboard but the original sounds pretty good too.  I think I'm going to try it this summer with something on the grill.

I also decided to use a different sauce for the pasta, it's called Better Than Olive Garden Alfredo Sauce and I LOVE, LOVE, LOVE it!!  It's thick, creamy and oh so cheesy.  Even better is that I made a big batch of it awhile ago and I have some in my freezer that I can just pull out to use. 

Blackened Chicken with Creamy Pasta & Broccoli

For the Seasoning
2 Tbsp Smoked Paprika
2 Tsp Black Pepper
2 Tsp Dried Oregano
2 Tsp Sugar
2 Tsp Kosher/Coarse Salt
1 Tsp Garlic Powder
1/2 Tsp Onion Powder
1/4 Tsp Cayenne Pepper, or more to taste


For the Marinade

4 Tbsp Lime Juice
4 Tbsp EVOO (aka Extra Virgin Olive Oil)
3 Tsp Dried Cilantro Leaves
1/2 Tsp Coriander Seed
1/2 Tsp Ground Coriander
2 Tbsp Brown Sugar
1 Garlic Clove, minced


For the Chicken

Homemade Pasta...mmmm
1 1/2-2 Tbsp Coconut Oil, for cooking
2 Chicken Breasts (about 1 1/2 lbs), split in half crosswise
Head of Broccoli, cut up into small florets
1/2 lb Pasta, either Angel Hair or a Spaghettini
(For the pasta, I make my own at home, which is a recipe I'll post down the road.  Feel free to use dried pasta or fresh pasta from the store.)

For the Sauce

Prepared Better then Olive Garden Alfredo Sauce
(sorry to leave you hanging on this, I'll do another batch up soon and post it)
Sourdough Bread Crumbs
Diced Tomatoes, for garnish
Fresh Grated Parmesan Cheese


To start off I made up the marinade for the chicken.  If the chicken breasts were frozen you could toss them in just like that but, I would marinade them for at least a couple hours.  Since my chicken breasts are thawed, I just combined all the ingredients for the marinade and dumped it into a Ziplock bag, tossed in the chicken and stuck it in the fridge for about a half hour or so. 

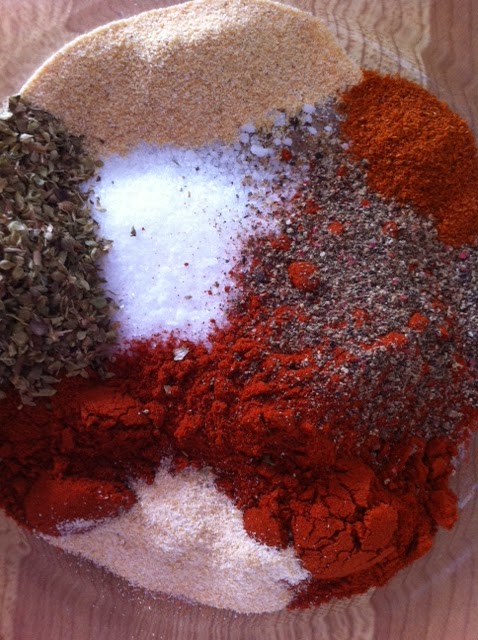
While the chicken was marinating, I put together the seasoning.  How did I do that you might ask, well I went all Emerilish and tossed everything in a medium bowl, gave it a stir to combine it all together and then set it aside.

Once the chicken was done marinating, I took the chicken out of the marinade and let it drip off for a couple seconds and then pressed each piece into the seasoning, thouroughly coating each one. After the chicken was all coated I covered it with plastic wrap and set it in the fridge to wait while I got everything else ready to go.
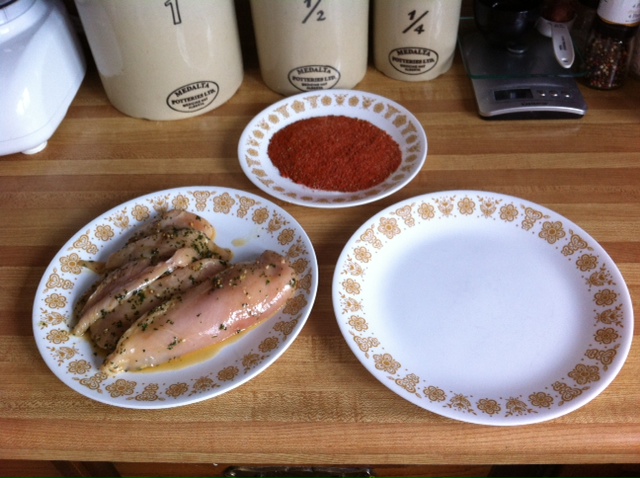
Ready to Hit the Hot Stuff:)

Once I was ready to get dinner on the table I preheated the oven to 375F and heated my cast iron skillet (you could use any heavy bottomed pan) starting at low to warm it up and then increasing it to medium-high.  I did this because I've done some research on cast iron and I guess you shouldn't just toss it on a hot element, you should gradually allow it to heat up.  It's probably not a big deal but, my way of thinking is that if I treat my kitchen appliances/tools well they'll do the same to me:)

I added the coconut oil to the skillet once it had heated up a bit and allowed it to heat up for a minute or two.  Next up, I added the chicken pieces to the hot pan and cooked them until they were, well, blackened, about 1-2 minutes per side.  I did the chicken up in two batches because my cast iron skillet will only hold two at a time.  Once they were good and black, I transferred them to a parchment covered baking sheet and threw them in the oven.  The chicken took about another 8 minutes, if you can't tell from previous posts, I'm an internal temperature freak, so I wanted it to be 160F and the juices to run clear. 

While all of this was happening, I tossed the broccoli into my rice steamer and steamed it for about 2-3 minutes, until it was bright green and tender, and I brought my large pasta pot of salted water to a boil and added the pasta. Once the broccoli was done, I removed it and put it into another bowl and seasoned it with some salt and pepper.  You want the noodles to be al dente, so cook them according to the package instructions.  Once they're done, drain them, but don't rinse them. 
Some Good For You Green Stuff

Since my pasta sauce was already made, I just needed to thaw it out and heat it up.

Once everything was done, I combined the noodles, broccoli and sauce and added a little bit of my Epicure Red Garlic Sansel to taste.  Then I sliced the chicken up thinly and added it to the top of the pasta.  To garnish it, I was going to put some diced tomatoes on top, but I forgot and I sprinkled it with some fresh sourdough crumbs from the loaf I made yesterday and topped it off with some fresh grated parmesan cheese. 


Cutting down on the spice a bit was key for Aaron and the kids to be able to eat this and having it mixed with the creamy pasta and broccoli helped too.  It was a thumbs up from everyone at the table, Connor even had seconds (without broccoli though).  This is what the plates looked like after dinner was over.


Tuesday, 19 February 2013

Feeling Sour Today:)

First off I want to share a pic of my three "taste testers" from last night...of course my two kids, Connor and January, and Jalena (aka Jalena Beana), my friend Jenn's little girl. We also had success at Aunt Carrie's last night in the potty training department, so a big shout out to Jalena for no accidents at Aunt Carrie's:)

The Kiddo's
So, the title, feeling a little sour today...no, I'm not miserable but I do have a hankering for some sourdough bread, it's been a couple weeks since I made any.  I'm going to be honest though, I woke up this morning knowing I was going to be making it because sourdough bread=time, from start to finish it takes me about 20 or so hours to make.  I've found that sourdough itself isn't that difficult, it's the waiting (which reminds me, just a heads up, this is going to be a looooong post) and, if you're like me and want to do it yourself, the actual creating of your starter.  My starter is one that I've created myself and I did it without the use of ANY commerical yeast.  I started with just flour and water and caught some wild yeast to get it going.  I'll make up another starter sometime in the future to show you how I managed that.


Here's Our
SuperBowl Feast:)
So back to my sourdough, it all starts the night before when I get my starter ready by making a sponge that sits overnight.  I've used a bunch of different recipes and techniques but the sourdough I made to go with my Epicure Extraordinary Cheese Dip (this is an amazing dip that deserves it's own blog) on SuperBowl Sunday was by far the best.  I've adapted my recipe a bit and use a technique I got from a great blog I found called LlynLines, clicking on the link will take you to the blog and there's some video and information that is just awesome if you're looking to make your own sourdough.  Well, that's enough chit chat for now, let's move on to the sourdough because I'm already hungry and I know it's going to be awhile before I get to have any of it:) Oh, and FYI, this recipe make enough for two loaves, if you only want one, just split it in half.

Sourdough Bread
(This recipe uses more water then I usually do)

For the Sponge

200 grams Sourdough Starter
500 grams Strong White Flour (aka White Best for Bread Flour)
775 mL Warm Water


My Starter
Making the sponge for sourdough is easy, dump your starter in a bowl, add the warm water and flour.  Stir to mix it up.  Cover it with a tea towel and put it in a warm spot overnight.

Ingredients for the
Sponge
(The elastic on the jar of my starter is where it was at after I had fed it the day before, it's hard to tell but it actually grew up and over the lid of the jar...my baby's a very active baby)


I usually use less water when I make sourdough but I wanted to increase the hydration which I'm hoping will give me a more holey, lighter loaf. In doing that, I've realized that the dough is a little harder to work with, it's stickier and a little more "slack". If you're doing this for the first time you'll probably want to start off using less water until you're used to handling the dough. I would start off using 670 mL which is what I used for our SuperBowl Feast sourdough.

Of course I also have some leftover starter, this is what I continue to feed and love on a regular basis.  My leftover starter I feed with equal parts flour and water, so 150 grams of starter gets 150 grams of both flour and water, and then I cover it up and usually put it in the fridge.  When my starter is in the fridge I only have to feed it once every week or so, but if it's sitting on my counter it must be fed every day.  Honestly, this is really scientific stuff that I can't explain so if you want the low down you'll have to do what I did and do some research.  I left my starter out overnight so I could show you some pics of how she grew. 

Last night after being fed
What she looks like from the top
This morning, after a night of feeding,
notice the amount of growth from last night to today.

A close up of her bubbly goodness...that's the yeast at work:)

Ok, so now we're at this morning, here's what my sponge looked like when uncovered it to say good morning.

Good Morning My Lovely:)


 For the Sourdough Bread


Bread Ingredients
335 grams Strong White Flour
220 grams Whole Wheat Flour
55 grams Rye Flour
20 grams Salt

Take the sponge and add all the flour, DON'T add the salt yet.  Just mix it in enough that the flour has all been absorbed. Then, cover it with a tea towel and leave it to rest for about 10 minutes.

You could almost mud your walls this...lol


After the 10 minutes is up, add the salt and mix it all in with your hands.  Quick tip, oil up your hands before, it's a VERY sticky dough and this will help to keep the mess to a minimum.
 
Squish, Squish
Once you've squished all the salt in, put it into a oiled bowl, cover with an oiled piece of plastic wrap and a tea towel and set it in a warm spot for 10 minutes.

Sitting in the bowl

Once the 10 minutes is up, oil your hands up again, I also spray a litte bit of oil on my counter, and dump the dough onto the counter.  It is going to be very sticky, almost like putty...whatever you do...DON'T ADD MORE FLOUR!! Using your fingers, kind of stretch and push it out into a rectangle.  Then, take the bottom third and fold it up, then the top third and fold it down, pushing into it a bit to make somewhat of a seal.  Turn it around and repeat this.  That blog I was talking about earlier, LlynLines, those are the videos you want to watch to see how to do this. Once you've done the second fold, turn it over and turn it in a circle tucking the ends underneath to make what will resemble a loaf.


These pics were all after the
second time I did the fold.


After the original fold above, you're going to recover it, wait about 20 minutes and do it again.  Then recover, wait about 30 minutes and do it again. And again after another hour.  And again after another hour.  And again after another hour.  Remember what I said about sourdough=time, I wasn't lying was I:) 

After the final fold you want to let the dough rest for about an hour before cutting it in half and shaping it into loaves.  I just thought of a little bit of info that is pretty important when it comes to sourdough...if you haven't noticed, and to be honest you probably haven't, I don't use any metal utensils, bowls, anything because for some reason, metal and sourdough just don't mix.  I don't know why, all I know is everything I've read says metal is a no-no.  I haven't tried to test the theory because I don't want to waste my time or my starter to find out...I'm just trusting it to be true.

To shape the loaves use a sharp knife to cut the dough in half.  Then take the first half and using your fingers push it out into a rough circle/oval.  Take an edge and fold it into the middle, repeat this until you've gone all the way around.  Once you've done that flip it over and turn and tuck it all up under itself to make it into a round loaf.  Once you've done that, put it into an oiled bowl and cover it with lightly oiled plastic wrap and a tea towel.


All shaped up and ready to proof

Once you've shaped your loaves, let them proof in a warm spot for about 4-5 hours.

Confession...it wasn't until the alarm I had set to put the bread in the oven
went off and I looked at wondering why I had set it that I realized I had
actually put my first loaf in the oven an hour and a half early and the second
one went in about 45 minutes early. I must've had a lot on my mind because
that was one heck of a blonde moment...lol. Oh well, they still taste good, so
I'm not  going to complain.
 
Slashed and ready to go in the oven,
this recipe didn't hold it's shape as well as
my other on with less water
Preheat your oven to 450F and put in your pizza stone, if you have one, to heat up as well.  When the loaves are ready to go into the oven, slash the tops and place them on your pizza stone.  I usually do one loaf at a time because of size restrictions.  If you want that nice crispy crust, either toss a 1/2 cup of hot water onto your oven floor (only if it's electric, if you have a gas oven that won't work) or I've taken an aluminum pie plate and poked holes in the bottom.  I place it on the rack just under the pizza stone and when I put the loaf on the stone I add the water to it and it drips out onto the floor of the oven creating steam.  The steam is what gives you that crispy crust. 

After you've placed the loaf in the oven, turn it down to 425F and cook for about 20 minutes, turn it down again to 400F and cook another 10-20 minutes.  The loaf is done when you hit an internal temperature of 190F and it sounds hollow on the bottom when tapped.

Fresh out of the oven

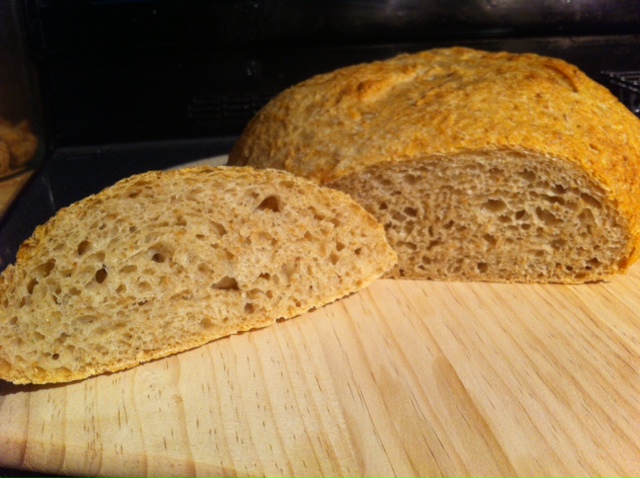
A nice looking crumb with lots of holes:)


All in all I'm pretty impressed with what came out of the oven.  That being said, I think that the next time I try this with the extra hydration I'm going to use the Dutch Oven technique so it holds it's shape a little better.  My friend Jay came over for a visit tonight and he is not a huge fan of sourdough...too bad for him, I made him taste test it anyways, he actually didn't mind it because it didn't have a really sour flavour, it was a lot more mild, but he loved the crisp crust:)

So, how long did it take to make this...I started at 10:30pm on Monday night, I pulled the final loaf out of the oven at 7:00pm Tuesday night, in actuality, they should have been just going into the oven then so I should've been done around 8:30ish. 


Monday, 18 February 2013

A Little of This, A Little of That

 
This just warms my heart:)
Take note of the book, she
must've scammed it while
I wasn't looking!!
Today's Family Day so we're having a nice, quiet, well, Family Day.  I make up meal plans every week, sometimes I'll do two weeks at a time, which is what I did last time so I've known for awhile that I was going to make up some Baked Potato Soup for dinner tonight.  You would think that knowing grocery stores were going to be closed today that I would do a quick double check to make sure I had everything I needed, I didn't, so of course I was caught today a little bit unprepared.  No worries though, instead of throwing my hands in the air, having a hissy fit and deciding on something else, I'm going to make do with the little of this and little of that, that I do have, oh, and send Aaron to pick up a couple things at a variety store.  

(Confession, I used up my sour cream last night to make chip dip for
our Sons of Anarchy session, and, since he was already going, I didn't want
to thaw out a pound of bacon so I had him grab that too.) 

My Saving Grace:)
My biggest challenge for making my soup today was the fact that my green onions have seen much better days and are, how shall I say it, unedible.  Usually that wouldn't be a big deal, but for Baked Potato Soup they're a neccessity in my opinion. Of course, they're also something I can't just go and pick up at the variety store, I'm going to have to have a talk with them about that...lol.  Usually, one of my go to things in a situation like this would be my Epicure 3 Onion Dip Mix but I don't want to use up everything that I have on hand, however, I thought to myself, why not add some to give it a little more zip and use something else as well.  Here's where something I bought awhile ago to try out but haven't yet done so comes into play...shallots.  I did a quick research session online and found that they would probably be my best bet and hopefully I'm right.  We'll see, I've been known to be mistaken before, never wrong, just mistaken:)

Baked Potato Soup

5-6 Baking Potatoes, I just used Yukon Golds, if they're big, stick to 5
2 c. Water
1 Litre Milk
3-4 Stalks of Celery, finely chopped
1/4 c. Unsalted Butter
1/2 c. Sour Cream, plus extra for garnish
6-7 slices Bacon, cooked & crumbled, plus some extra for garnish
1 Shallot, finely diced (I usually use 3-4 Green Onions)
1 1/2 c. Sharp Cheddar Cheese, shredded, plus some extra for garnish
1-2 Tbsp Fresh Parsley, chopped
2 Tsp Epicure's 3 Onion Dip Mix
Salt & Peppper to taste
Chives for garnish

Preheat your oven to 350F.  Wrap potatoes in foil and bake in the oven for about 1 1/2 hours.  While potatoes are baking, get the rest of your ingredients ready.  Remove potatoes when done and set aside to cool. 


Ready to Go In the Oven
Mmmm...cooked bacon
Place bacon on an aluminum foil covered baking sheet and place in oven to cook for about 15-20 minutes.  Once done, remove from baking sheet and place on paper towels to sop up the extra grease.

(Obviously I'm not going to use all the bacon pictured in the soup, but I figured I'd do up the whole pound and cut it all up and freeze the rest to use as bacon bits when I need them)


Once cooled, slice the potatoes in half  and scoop out the middle.  Be careful, chances are the insides are still pretty hot, you're going to be playing a little bit of hot potato.


As a Carbaholic, this pic makes my day!!
Add the water to a large stockpot and heat over medium heat.

Melt butter in a skillet over medium-high heat.  Add the celery and saute for about 2 minutes.  Add butter and celery to the stockpot.

Cheese make everything better too!!
 
Can you tell I love bacon:)
 Stir in the milk, sour cream, cut up bacon, shallots/green onions, shredded cheese, parsley, 3 Onion Dip Mix, salt and pepper.

Reduce the heat to low and allow it to simmer for about 20-30 minutes, stirring occasionally.
I've been known to mash
up the bigger pieces of
potato a little bit. It's a
personal preference.


When you're ready to serve it up, ladle the soup into bowls and garnish with a dollap of sour cream, some shredded cheese, crumbled bacon and top it off with some chives. 

That's a Meal:)
I made sure to have the soup done before Aaron had to leave for work today...I anxiously waited for him to sit down and hoped beyond all hope that he was going to leave for work with a full stomach of soup that he enjoyed eating, not just choked down to be nice.  As he sat down and picked up his spoon I held my breath.  I almost couldn't watch as he took his first bite and then I heard him say..."Wow Babe, this isn't your best attempt."  Nah, I'm just joking with you, he liked it:)