Friday 26 April 2013

Leftovers....What to Do???

How many people truly like leftovers??  

I have a confession to make...this girl doesn't...there's a few things that I don't mind but for the most part I just can't stand them.  I'm not alone in this, my grandpa, who was born in the 1930's, who can't stand waste, who thinks a slice of bread with gravy=dessert and who will grab anything off the side of the road that "seems" useful shares this trait with me.  There's just something about leftovers that DOESN'T turn my crank.  

So, what do I do with leftovers?? 

Well, when Aaron was working in Guelph and had access to a microwave for lunch, he had no problem taking leftovers for lunch, but those days are over and done with now.  Looks like I'm in between a rock and hard place when it comes to leftovers now:(  I guess it's time to get creative and figure out how to make use of what's left or reduce our portion sizes so much that we don't have any.  Reducing portion sizes isn't happening so it looks like figuring something out is the only way to go.  

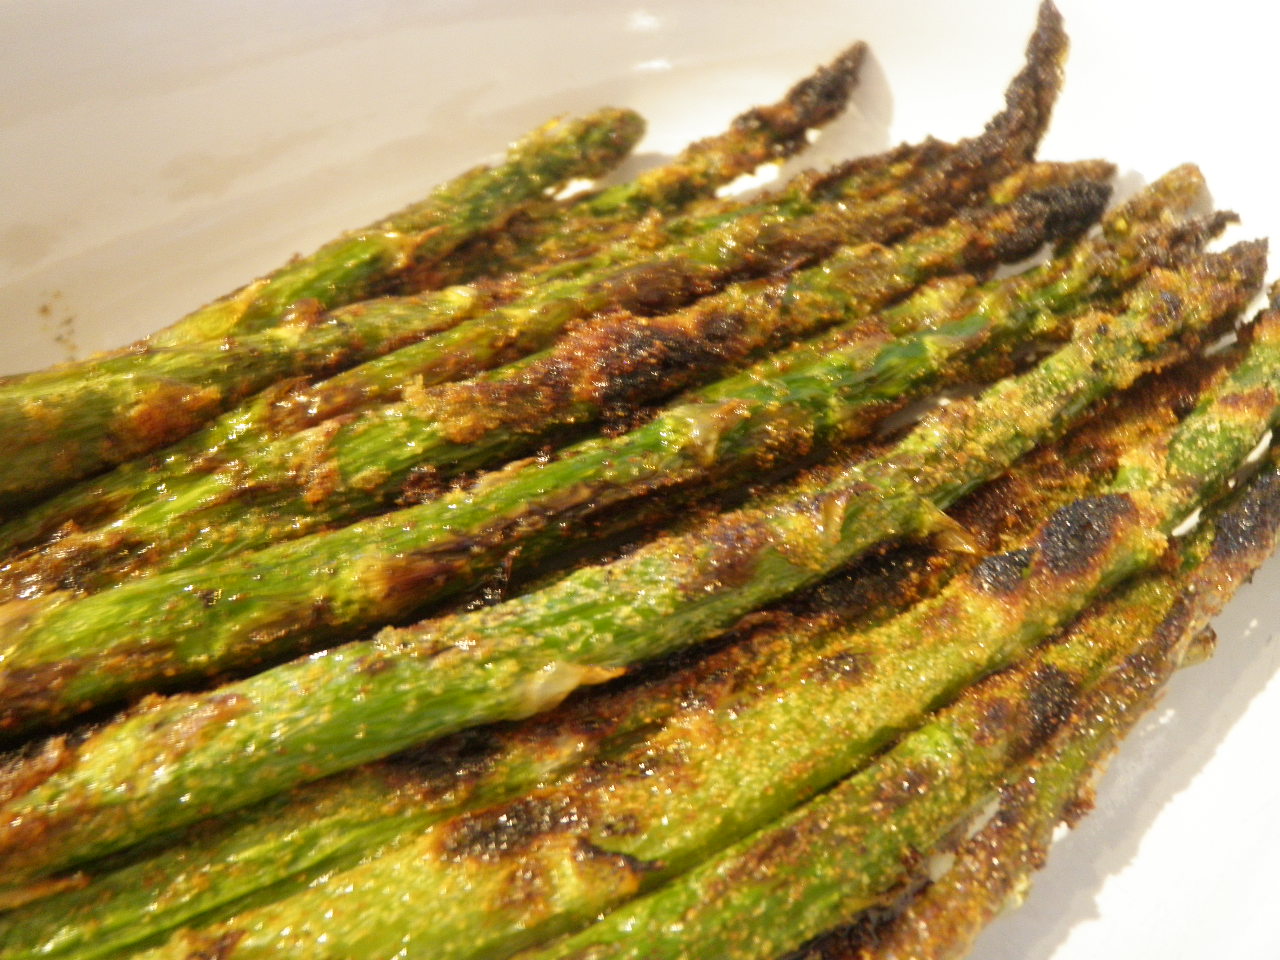
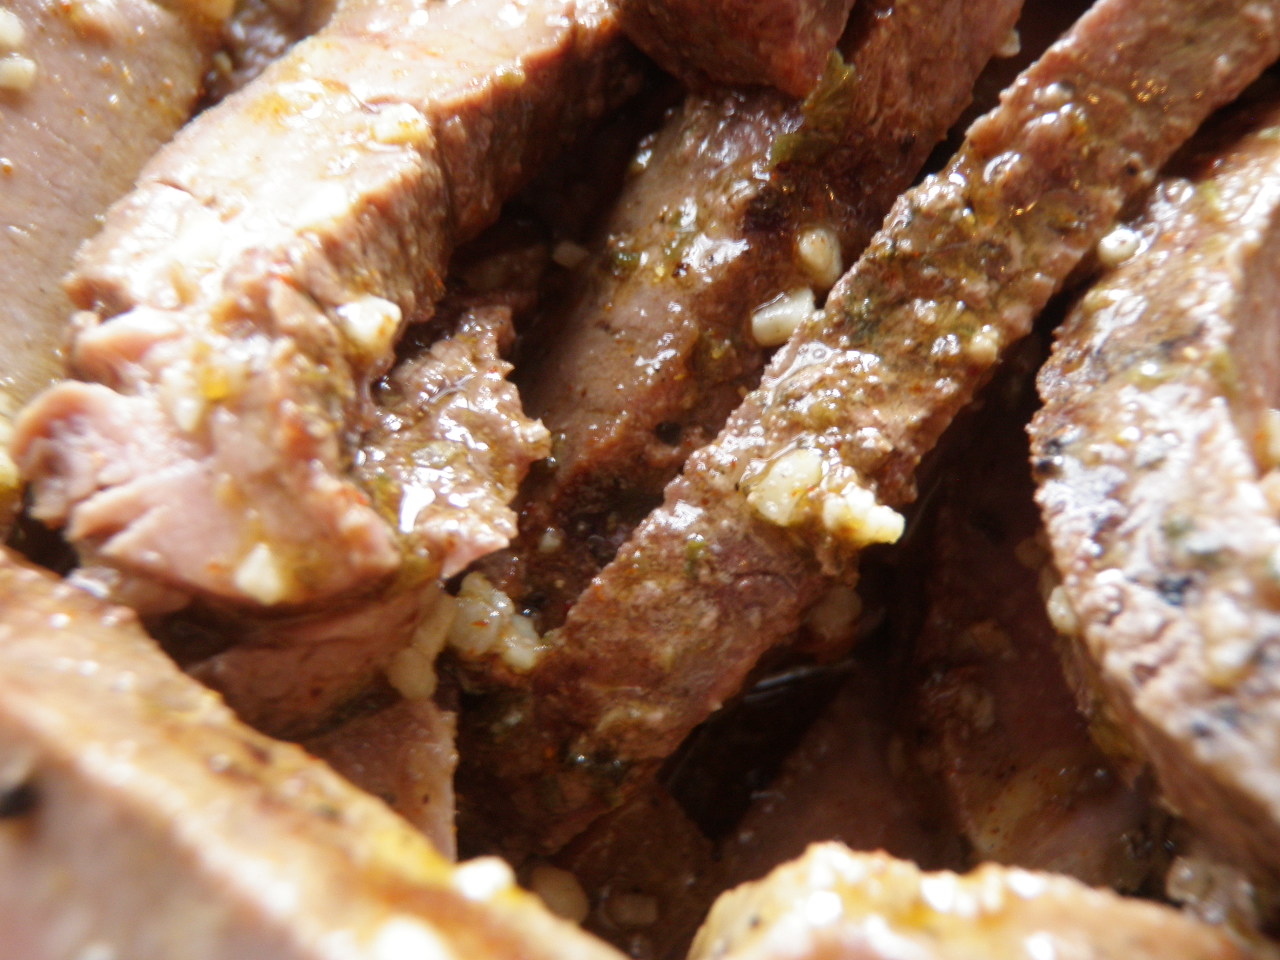
So, Monday was a beautiful day and I fired up the grill for the first time this year and was so excited.  We had steaks and asparagus on the grill with some fried onions and the weirdo that I am, some hollandaise for my steak too.  Guess what, I was left with the dreaded leftovers...no asparagus, that was gone in no time, but there was plenty of steak left.  That's a big problem because leftover steak is on my "not a chance in hell am I reheating that and eating it" list.  What's a girl to do:(  Well this girl decided that fajitas would be a good idea to make use of the hunks of meat sitting in my fridge.  I bet you can guess what we had for dinner on Wednesday night...that's right, steak fajitas...bet you didn't see that coming...lol.  


Fajitas are always a quick and easy meal but I usually do chicken.  Since I was already changing it up I figured why not marinade the leftover meat after I sliced it up to give it some extra pizzazz so that's exactly what I did...hey, my kitchen, my rules right:)  Anyways, if you're a fan of fajitas this might just be something you want to check out cause I think I'm on to something here.  

Leftover Steak Fajitas

For the Marinade

1/2 c. Lime Juice
1/4 c. Extra Virgin Olive Oil
4 Cloves Garlic, minced
1 Tsp Ground Coriander
1/2 Tsp Chili Powder
1/2 Tsp Cumin

For the Fajitas

1-2 Tbsp Extra Virgin Olive Oil
1 lb Leftover Steak, cut into slices
2 Bell Peppers, cut into slices
1 Red Onion, cut into slices
1 Tbsp Epicure Fajita Seasoning
8 Flour Tortillas
Sour Cream, Salsa & Shredded Cheese

This recipe is so easy it's not even funny, I started it off by mixing all the ingredients for the marinade together and pouring it in a Ziplock bag with the steak slices and letting it marinade for about an hour, to be honest, I would probably give it more time the next time to boost the flavour.


Check out that garlic...I love garlic:)


Ready to hit the fridge.

Once the steak was done marinading I heated the olive oil over medium heat and added the steak.  I just grabbed it by the handful and tossed it in so it wouldn't be too liquidy with the marinade but if you want to add some of the marinade in with it feel free, you might have to add a little bit of cornstarch/flour to thicken it up though.  


Since the steak was already cooked I added the veggies right away, if it was uncooked I'd let it cook a bit before adding the veggies so they don't get to soft.


Once the veggies were in I added the tablespoon of Epicure Fajita Seasoning and stirred everything all up.  Then I let it basically heat up for about 7-8 minutes, until the veggies had softened up a bit.

That's it, that's all...when everything is ready to go it was fajita making time. 

So I always start off with a plain flour tortilla...well d'uh, don't we all:)


Then I add a little bit of sour cream.


Next up is some salsa.


Then the cheese.


Finally time for the meat and veggies.


And my finished product looks like this:)


I must say, not bad for leftovers...I may convert to a leftovertarian yet...lol.

Sunday 21 April 2013

In Hot Water

I never knew how many uses there really was for chicken until I started doing a lot of cooking...chicken puts the term "million and one uses" to shame.  I swear that there is an infinite amount of ways to use chicken and it seems like a good majority can start with just plain old poached chicken. 

Whenever I used to hear the term "poached" all I could think of was those nasty hunks of meat with no flavour, no texture and just bleeeech.  That was until I started poaching my own chicken and realized that if I did up a bunch at once and then shredded it I'd have a quick lunch, dinner on hand in the freezer that I just needed to "spice up" to my liking.  As far as I'm concerned, ideas like this are born from genius...lol. 

I started by just using plain old boneless, skinless chicken breasts.  They did the job but I was positive I could do better.  Then I went hunting in my freezer and found some bone-in, skinless breasts that I'm pretty sure had been there for awhile.  The nice thing about poaching the chicken is it adds moisture, which for some freezer dried, forgot about chicken is a good thing.  Shredding it to use for sandwiches, pizza, quesidillas, soups or anything else you want to use it for is great too, because it hides the fact that I've forgotten this poor hunk of meat in the freezer and have brought it back to life, hopefully:)  Even better is that once I'm done, all I have to do is strain the liquid in the pot and I've got homemade chicken broth/stock...talk about waste not, want not!!

Poached Chicken

4 Bone-In, Skinless Chicken Breasts
10-11 Cups Water/Stock/Broth (I usually just use water because I'm seasoning it anyway)

2 Bay Leaves
1 Tsp Epicure Poultry Seasoning
1 Tsp Epicure Pot Herbs
1 1/2 Tbsp Epicure Chicken Bouillon Base
2-4 Sprigs Fresh Thyme (or 1 Tsp Dried)
Handful of Fresh Parsley (or 1/2-1 Tsp Dried)
A good pinch of salt


To start I place the chicken pieces in a single layer in the bottom of a stock/soup pot that has a tight fitting lid.  Cover them with enough liquid to have about 1"-1 1/2" over top, which for me is 10-11 cups.  Then toss everything else it.  I love how easy that is:)


Bring it to a boil, uncovered, skimming any crap off the top as it comes up.

This is the crap you want to skim off
Once it starts to boil, turn the heat down to keep it at a slow simmer and let it simmer, partially covered for 10-12 minutes. 


Turn the heat off and fully cover it tightly and allow the chicken to sit in the hot water for 20 minutes.  I aim for an internal temperature of 165F once it's done. 


Once it's done, I just shred it using 2 forks and then divide it up into 1 cup or 2 cup portions and freeze it. 


Even better, like I said earlier, I strain the remaining liquid and voila, homemade chicken stock/broth.


I love how doing this keeps me ahead of the game when I'm under the gun for a quick lunch/dinner and it also lets me have my own chicken stock/broth on hand, that isn't full of salt, to use for soups, stews etc.  I ended up with about 6 cups of shredded chicken and 11 cups of chicken stock/broth:)

Tuesday 16 April 2013

Hooked on Fish

So I've been kinda MIA the past few days but I think I have a pretty good excuse, you see, this past weekend was a bit of a big weekend for me. 

On Saturday we had our nephew Zachary's 2nd Birthday Party and after I went out with some friends to see another my buddy Scott play, his band is called After the Lounge and they're pretty good...check out the link and see for yourself:) 

Sunday was an early day, up at 5am to help out at Gopher Dunes, it's a nearby motocross track and they were hosting the CMRC Opener...it's always so much fun there.  It's not just motocross there either, every Spring and Fall they have a 4x4 Mud Run and it is CRAZY!! 

Remember how I said Aaron was going back to work with his brother and Dad...well yesterday was his first day so of course the absolutely awesome wife that I am, I cooked up his favorite...Chicken Parmesan for dinner.  I know I've already posted that recipe so I didn't want to repeat it for you:)

Here's the big part of the past few days though...are you ready...I was inducted into the Niagara College Knights Hall of Fame on Friday night.  I'm extremely honoured by this and am still flying on cloud nine.  You see in college I played a little bit of basketball, to be honest, I lived it, I breathed it and I dreamed about it.  I started playing when I was about 10 years old and it was my passion for a lot of years, so to be recognized and inducted into the Hall of Fame is a pretty big deal to me.  You can check out this article that was in my local paper, the Simcoe Reformer, if you want:)


Anyways, enough about me, this blog is about cooking and I've been hung up on fish lately.  I know eventually I'm going to have to branch out in the fish waters and start cooking something other then tilapia but it's what's in my freezer right now so that's what we had tonight. 

Remember last week when I friaked, well tonight I changed it up a bit and did a little bit of froiling...you know, fry it and then broil it.  I used the same marinade as I did when I friaked, a Chili Lime version, because I really liked the flavour.  I did however, make a change...instead of Panko I dredged the fillets in a little flour mixture and after I fried them I brushed them with some mayo, grated some fresh Romano on top and tossed them under the broiler like that. 

Since I've been telling you all about it I guess it's time I got down to the nitty gritty and just give you the recipe:)

Froiled Romano Tilapia
(adapted from Kalyn's Kitchen)

For the Marinade

1/4 c. Lime Juice
2 Cloves Garlic, minced
1/2 Tsp Chipotle Chili Powder
1/2 Tsp Paprika
1/2 Tsp Dried Cilantro
1/2 Tsp Coriander Seed
2 Tbsp Extra Virgin Olive Oil
1/2 Tsp Honey
1/4 Tsp Celery Salt
Pinch of Cayenne Pepper

For the Fish

2 Tilapia Fillets
1/2 c. Flour
Pinch of Cayenne Pepper
Salt and Pepper
1 1/2 Tbsp Mayo
3 Tbsp Fresh Grated Romano Cheese (or Parmesan)
1-2 Tbsp Avocado Oil

Start off by mixing all of the marinade ingredients together and placing the fillets in either a shallow bowl or Ziplock bag, adding the marinade and let it sit in the fridge for about 45 minutes.


Next, in a shallow bowl, add the flour, cayenne and some salt and pepper.  Mix that up and when the fillets are done marinating, lightly dredge them in the flour mix. 


Heat the oil over medium high heat and add the fillets.  Cook them 3-4 minutes per side, carefully flipping them over so they don't fall apart and do your best not to peek!!  While they're cooking put your oven to broil and take a baking sheet that can take the heat of the broiler, cover it with some aluminum foil and lightly grease the foil. 


Once the fillets are done cooking, carefully place them on the baking sheet.  Brush them gently with the mayo and top them with the grated cheese.  Place them under the broiler for another 3-4 minutes, you want the cheese to start to brown. 


From here, serve them up nice and hot...the cheese will crisp up a bit as it cools.  I served mine with Epicure's Roasted Garlic Aioli. 

Connor, who complains every time I make fish didn't mind this.  I think it's because it didn't fall apart and flake like fish normally does.  He almost thought it was chicken...lol.


Thursday 11 April 2013

Word for the Day...Friaked...Fried then Baked

I'm going to go out on a limb and say you've never heard my word for the day before.  I'm thinking I should give Webster's a call and let them know they can add it to next years edition.  Just to clarify, the base word is Friake, but while you're cooking you're Friaking and once your done you've Friaked and since you're the one doing the Friaking you can consider yourself a Friaker...I mean the possibilities are endless aren't they:)


Anywho, since I've decided that I'm a bona fide Friaker I wanted to try something out tonight.  First, I wanted to Friake some Tilapia, the last time I made it, it just didn't have enough the "crunch" for me and second, I've been chomping at the bit to try doing a Chili Lime version because I really want to use my Epicure Chili Lime Sansel. 

Friaked Chili Lime Tilapia

For the Marinade

1/4 c. Lime Juice
2 Cloves Garlic, minced
1/2 Tsp Chipotle Chili Powder
1/2 Tsp Paprika
1/2 Tsp Dried Cilantro
1/2 Tsp Coriander Seed
2 Tbsp Extra Virgin Olive Oil
1/2 Tsp Honey
1/4 Tsp Celery Salt
Pinch of Cayenne Pepper

For the Breading

3/4 c. Panko Breadcrumbs
1/2 Tsp Ground Coriander
1 Tsp Garlic Powder
Pinch of Cayenne Pepper

For the Fish

2 Tilapia Fillets
1-2 Tbsp Avocado Oil
1 Tbsp Mayo
1/4 Tsp Epicure Chili Lime Sansel
Salt & Pepper

Start off by combining all of the marinade ingredients together.  Place the fillets in a shallow bowl and pour the marinade all over, spooning some onto the top to make sure they are well covered.  Cover and put in the fridge for 30-45 minutes.


Into the Marinade for the Little Fishy's
While the fillets are hanging out in the fridge combine the mayo and Epicure Chili Lime Sansel with a little bit of salt and pepper. 


Chili Lime Sansel Mayo Mix...Doesn't that look yummy!!

Next up is the breading, mix all of the ingredients together in a shallow bowl and set aside until you're ready.


The Crispy Crunch for my Fishy's

About 10-15 minutes before you're ready to to start playing with your food preheat your oven to 400F.

Once the fillets are done marinading take one and allow it to drip off for a few seconds and then brush on some of the Chili Lime Mayo.


All done Marinading


Brushing on a Little Bit of Extra Flavor

From here it's into the breading...coat both sides really well, I will press the breading into the fillets to make sure I get a lot on there.


All Crunched Up and Ready to Go

Once the fillets are coated really well take a large frying pan and heat the Avocado Oil over medium high heat.  Add the fillets and pan fry about 2-3 minutes per side.  Take a wire rack lightly coated with oil on top of a baking sheet and carefully place the fillets on it. It's into the oven they go after that.


Out of the Frying Pan & Into the Oven Next

Cook them in the oven for about 5-10 minutes.  You'll know they're done when they flake easily or have an internal temperature of 140-145F.


The Finished Product


We had ours with Roasted Asparagus and a mix of Black/Brown Rice with Shallots, Celery and Garlic...mmm...mmm good:)


Now that's a dinner worth finishing right there!! 

I'M BAA-AA-CK:)

Wow, it seems like it's been forever since I've written anything on here, it hasn't been obviously but it's been a whirlwind couple weeks since I last posted anything.  To be honest, I even forgot to post the last post but since it was such an epic fail in the kitchen I'm ok with that...lol. 

So, back to my whirlwind...it all started when Aaron made the decision to resign from his position in Guelph in order to work with his brother and dad which is a super bonus since he'll be home more, won't have to work shifts and generally will be a much happier person:)  The past few years due to his work schedule Aaron hasn't been able to go on any of our family vacations so my wonderful, amazing, fantastic husband decided we were going to go on a trip...of course in the midst of planning/packing all this is Easter weekend with multiple family dinners (of course one was at our place) and Aaron's Aunt Sheri (who lives in Bermuda) was coming down for a visit.  We managed to somehow pull this all off and even better was the fact that I didn't have a clue where we were going, just that I needed to pack for warm weather...lol.

Happy Easter
(Easter 2012)

So, on Easter Monday after packing us all up after having Easter Dinner here the day before with about 15 people we dropped the kids off with my parents and headed to the airport. I knew we were going to the Domincan at the point but didn't have a clue where...I also didn't know that a couple of our friends were coming with us either until we showed up at their place where I thought we were dropping off my truck but clued in when we started loading their luggage...hahaha.  It wasn't until we were on the plane and I was filling out our customs forms that Aaron had to let the cat out of the bag and I found out we were staying at the Hard Rock Resort & Casino in Punta Cana....yaaaay:)


I'm not going to bore you with the whole story of our vacation but I have to tell you that for someone like me who loves to eat, a lot of times resort vacations are lacking in that area....guess what...the Hard Rock didn't, it ROCKED MY WORLD...the food was awesome, beyond awesome and that just made me so happy.  Another great perk, the resort gave us credits to use towards various things on the resort as part of our package so while the guys went golfing, us girls hit the spa for massages and facials...I was in seventh heaven!!

Anyways, I just have to share some of our pics so for your viewing pleasure I present to you.....Aaron & Carrie's Hard Rock Vacation:)

Enjoying some refreshments at the Swim Up bar:)

Our Awesome Dinner Poolside at the Bongo Pool


Getting Behind the Grill with Chef Wellington at Zen
Our Amazing Dinner at Zen, Teppenyaki Style:)

Check out this video of Chef Wellington entertaining us...so much fun!!


Hard Rock just wouldn't be Hard Rock with out some Rock & Roll memorabilia:)

Some Kiss Memorabilia
My Reason for taking Pics of Kiss Memorabilia
(Halloween 2011)

If you can't tell, we had an awesome time:)  I would recommend this resort to ANYONE, even though it's a Casino Resort they had AMAZING stuff for kids, an arcade, a kids club and their own pool with HUGE waterslides, the bucket that dumps water on you and the umbrella sprinklers.