
 |
| The Kiddo's |
 |
| Here's Our SuperBowl Feast:) |
Sourdough Bread
(This recipe uses more water then I usually do)
For the Sponge
200 grams Sourdough Starter
500 grams Strong White Flour (aka White Best for Bread Flour)
775 mL Warm Water
 |
| My Starter |
 |
| Ingredients for the Sponge |
I usually use less water when I make sourdough but I wanted to increase the hydration which I'm hoping will give me a more holey, lighter loaf. In doing that, I've realized that the dough is a little harder to work with, it's stickier and a little more "slack". If you're doing this for the first time you'll probably want to start off using less water until you're used to handling the dough. I would start off using 670 mL which is what I used for our SuperBowl Feast sourdough.
Of course I also have some leftover starter, this is what I continue to feed and love on a regular basis. My leftover starter I feed with equal parts flour and water, so 150 grams of starter gets 150 grams of both flour and water, and then I cover it up and usually put it in the fridge. When my starter is in the fridge I only have to feed it once every week or so, but if it's sitting on my counter it must be fed every day. Honestly, this is really scientific stuff that I can't explain so if you want the low down you'll have to do what I did and do some research. I left my starter out overnight so I could show you some pics of how she grew.
 |
| Last night after being fed |
 |
| What she looks like from the top |
 |
| This morning, after a night of feeding, notice the amount of growth from last night to today. |
 |
| A close up of her bubbly goodness...that's the yeast at work:) |
Ok, so now we're at this morning, here's what my sponge looked like when uncovered it to say good morning.
 |
| Good Morning My Lovely:) |
For the Sourdough Bread
 |
| Bread Ingredients |
220 grams Whole Wheat Flour
55 grams Rye Flour
20 grams Salt
Take the sponge and add all the flour, DON'T add the salt yet. Just mix it in enough that the flour has all been absorbed. Then, cover it with a tea towel and leave it to rest for about 10 minutes.

 |
| You could almost mud your walls this...lol |
After the 10 minutes is up, add the salt and mix it all in with your hands. Quick tip, oil up your hands before, it's a VERY sticky dough and this will help to keep the mess to a minimum.
 |
| Squish, Squish |
 |
| Sitting in the bowl |
Once the 10 minutes is up, oil your hands up again, I also spray a litte bit of oil on my counter, and dump the dough onto the counter. It is going to be very sticky, almost like putty...whatever you do...DON'T ADD MORE FLOUR!! Using your fingers, kind of stretch and push it out into a rectangle. Then, take the bottom third and fold it up, then the top third and fold it down, pushing into it a bit to make somewhat of a seal. Turn it around and repeat this. That blog I was talking about earlier, LlynLines, those are the videos you want to watch to see how to do this. Once you've done the second fold, turn it over and turn it in a circle tucking the ends underneath to make what will resemble a loaf.


 |
| These pics were all after the second time I did the fold. |
After the original fold above, you're going to recover it, wait about 20 minutes and do it again. Then recover, wait about 30 minutes and do it again. And again after another hour. And again after another hour. And again after another hour. Remember what I said about sourdough=time, I wasn't lying was I:)
After the final fold you want to let the dough rest for about an hour before cutting it in half and shaping it into loaves. I just thought of a little bit of info that is pretty important when it comes to sourdough...if you haven't noticed, and to be honest you probably haven't, I don't use any metal utensils, bowls, anything because for some reason, metal and sourdough just don't mix. I don't know why, all I know is everything I've read says metal is a no-no. I haven't tried to test the theory because I don't want to waste my time or my starter to find out...I'm just trusting it to be true.
To shape the loaves use a sharp knife to cut the dough in half. Then take the first half and using your fingers push it out into a rough circle/oval. Take an edge and fold it into the middle, repeat this until you've gone all the way around. Once you've done that flip it over and turn and tuck it all up under itself to make it into a round loaf. Once you've done that, put it into an oiled bowl and cover it with lightly oiled plastic wrap and a tea towel.


 |
| All shaped up and ready to proof |
Once you've shaped your loaves, let them proof in a warm spot for about 4-5 hours.
Confession...it wasn't until the alarm I had set to put the bread in the oven
went off and I looked at wondering why I had set it that I realized I had
actually put my first loaf in the oven an hour and a half early and the second
one went in about 45 minutes early. I must've had a lot on my mind because
that was one heck of a blonde moment...lol. Oh well, they still taste good, so
I'm not going to complain.
 |
| Slashed and ready to go in the oven, this recipe didn't hold it's shape as well as my other on with less water |
Preheat your oven to 450F and put in your pizza stone, if you have one, to heat up as well. When the loaves are ready to go into the oven, slash the tops and place them on your pizza stone. I usually do one loaf at a time because of size restrictions. If you want that nice crispy crust, either toss a 1/2 cup of hot water onto your oven floor (only if it's electric, if you have a gas oven that won't work) or I've taken an aluminum pie plate and poked holes in the bottom. I place it on the rack just under the pizza stone and when I put the loaf on the stone I add the water to it and it drips out onto the floor of the oven creating steam. The steam is what gives you that crispy crust.
After you've placed the loaf in the oven, turn it down to 425F and cook for about 20 minutes, turn it down again to 400F and cook another 10-20 minutes. The loaf is done when you hit an internal temperature of 190F and it sounds hollow on the bottom when tapped.
 |
| Fresh out of the oven |
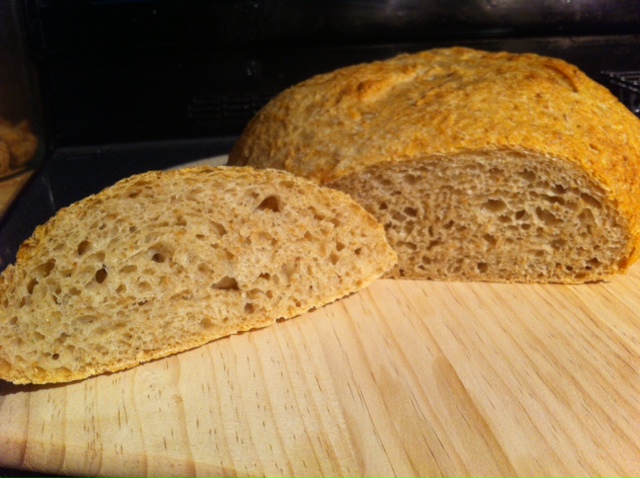 |
| A nice looking crumb with lots of holes:) |

All in all I'm pretty impressed with what came out of the oven. That being said, I think that the next time I try this with the extra hydration I'm going to use the Dutch Oven technique so it holds it's shape a little better. My friend Jay came over for a visit tonight and he is not a huge fan of sourdough...too bad for him, I made him taste test it anyways, he actually didn't mind it because it didn't have a really sour flavour, it was a lot more mild, but he loved the crisp crust:)
So, how long did it take to make this...I started at 10:30pm on Monday night, I pulled the final loaf out of the oven at 7:00pm Tuesday night, in actuality, they should have been just going into the oven then so I should've been done around 8:30ish.

When you have a minute can you tell me how you made your sour dough starter please? I am interested so I wanted to let you know I would love to hear how you did it.
ReplyDeleteThanks
Pauline Cloet
Hi Pauline,
DeleteThanks for reading & commenting, I love to know that people are finding something interesting/useful on my blog:) I used a fairly simple recipe to start mine and took about 5 days for it to really take off.
Day 1-1 c. Whole Wheat Flour and 3/4 c. Warm Water, mixed well and put in a large bowl covered with cheesecloth.
Day 2-Started to bubble a bit, so I fed it 1 c. Whole Wheat Flour and 3/4 c. Warm Water and recovered. (smelled like WW Flour with a little tang)
Day 3- Fed again, same as above and it still smelled the same.
Day 4 (PM)-Removed all but 1 c. of the starter and added 1 c. WW Flour and 3/4 c. Warm Water, recovered.
Day 5 (AM)-Did the same as Day 4.
Day 5 (PM)-Starter had doubled with lots of bubbles throughout. Removed all but 1 c. of starter, added 1 c. WW Flour and 3/4 c. Warm Water. About an hour later it was showing lots of activity and growing.
Day 6 (AM)-Removed all but 1 c. starter and fed 1 c. WW Flour and 3/4 c. Warm Water.
From here, I stated baking with it, it was doubling itself within 8 hours of feeding and very active. I also made a couple small starters out of the stuff I was going to discard to give to some friends and family who wanted some on Day 5.
Once it was active and ready to bake with I put it in the fridge so I only have to feed it once every week or so (don't tell, but I've gone 2 weeks without feeding it and it's survived) but if you leave it on the counter it needs to be fed daily, a lot of people say every 12 hours. When it's in the fridge it'll get a brownish/greyish liquid on top, it's called "hooch" you can either stir it in or dump it out, you're choice. I also went from feeding WW Wheat Flour to Unbleached All Purpose Flour after I had it for a couple weeks, that was more out of laziness so I didn't have to go down to the fridge in the basement to get my WW Flour and just used what I had on the counter.
I've had one that I started, go bad a couple days in, it smells really bad and looks funky, if that happens, toss it.
I hope this is what you were looking for:)
Thanks so much can't wait to get this going!!
Delete